The purpose of this post/article is to give generalized ideas for installing the two most popular types of LED Light Fixtures; the “Tile” or the “Strip”.
AquaRay products are used here as examples, but many of these installation methods are not proprietary to AquaRay and can be used for Ecoxotic, Aqua Illuminations, etc.
By Steve Allen
Revised 1/8/19
Sections Include:
- LED Strip Mounting Suggestions
- LED Tile Mounting Suggestions
- Important LED Placement; Canopy Ventilation, Humidity Dangers
- Red Sea Max Retrofit
- Bio Cube Retrofit (Oceanic, JBJ, more)
- Mini 400/500 Mounting for Fluval Edge
- MountaRay & Modular Mounting System
- Summary
For our purposes we will be using the high end TMC AquaRay LEDs, although these ideas will work with many similar LED lights, even “fish only” LEDs such as the more basic supplemental Ecoxotic Stunners or Marineland Single/Double Brights.
*LED Strips such as the TMC AquaBeam 600 or GroBeam 600s
Source: AquaBeam 600 Ultima ML-E LEDs
The popular LED Strip has many mounting options, although can vary by specific manufacturer. The TMC AquaRay 500/600 comes with brackets, screws, etc. for many options.
As well the AquaRay can also be utilized with the OPTIONAL AquaRay Modular LED Mounting Systems.
Source: TMC AquaRay Modular LED Mounting Systems
Please note that the above link/resource is for an optional system to mount your AquaRay LED lights. The purpose of this article is to show the reader DIY methods to set up many high end LED light systems with the parts that are generally already supplied.
 *A simple option, albeit not quite as good for spacing to provide optimum LED Light spread is to place the LED Strips inside existing plastic (or even metal) hoods after removing the T8 lamps that likely were already in these hoods.
However if this is done, for best results in both light spread and prevention of humidity damage I HIGHLY recommend then adding spacers (such as wooden blocks) to raise the hood(s) a couple of inches or more for better light spread and more importantly to prevent moisture/humidity under the hood next to the LED Light Fixture.
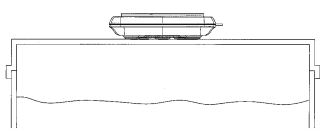
 *In my opinion the best option is the canopy mounting; not only is it the most simple, it also places the LED Fixtures at a distance from the water that allows for better light spread (6-10 inches) and lowers the risk of moisture damage to emitters (which still should be regularly wiped inside and out to prevent this damage, as with any light fixture used for aquariums I might add).

 If space is at a premium and/or if you prefer end to end mounting, consider cutting the plastic mounting brackets for the older 500s or newer 600s and then either placing lights end to end or slightly diagonally.
For instance since these LED strips are approximately 19 inches in length, but say your space for mounting is only 18 inches, by cutting these mounting strips (or just using the Teflon screws) and then adding a slight diagonal “tilt” to the light mounting, you can easily add these LED strips into a tight space.

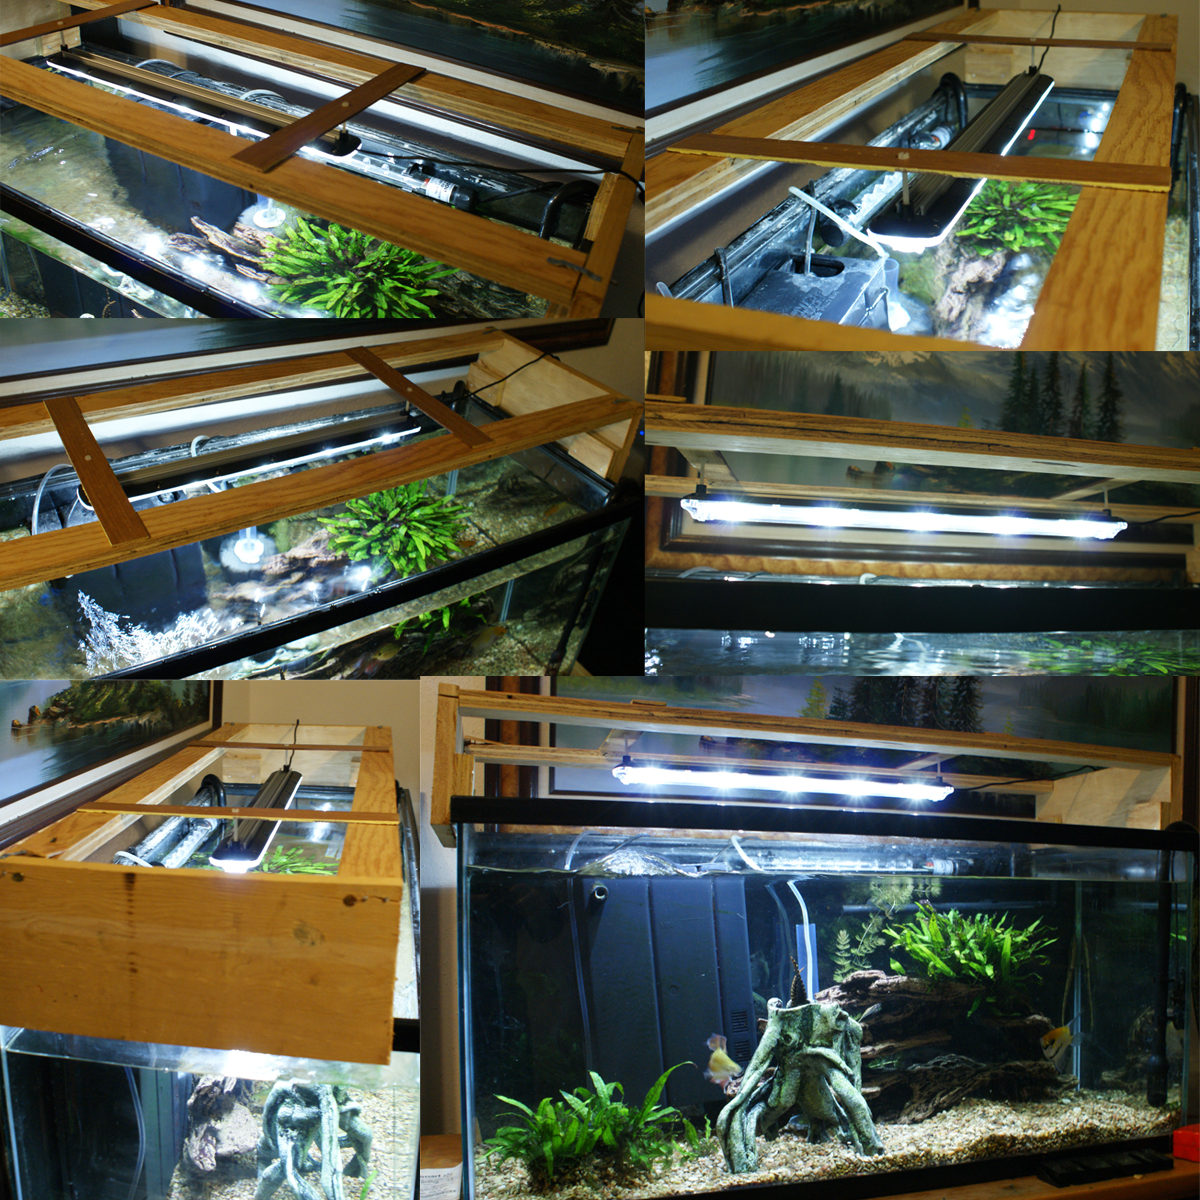
The picture to the left demonstrate the placement of two GroBeam 600 Ultima LED Fixtures inside a 45 gallon “Cube” aquarium
The top shows how each was mounted, using the brackets (which were cut), along with additional wood risers for each fixture.
The bottom half of this pictures displays the end results
Please click on the picture to enlarge
 *Another mounting option is to simply place on the aquariums glass, acrylic, or polycarbonate top.
Although many manufactures claim this method of direct top placement is perfectly acceptable, I would strongly recommend using a spacer of some type (such as wood blocks) to give at least an inch of space from the tank top. This again helps with light spread and more importantly lowers the risk of moisture damage.
Again, make sure to raise the fixture off from the glass or acrylic top by an inch or two (or more) to prevent humidity/moisture damage from condensation.
Besides the before mentioned method of using small wood blocks, the use of standard foam pipe insulation cut in half works very well and looks nice too in my opinion.
See the picture below for this idea of pipe insulation (click to enlarge):

 *Another variance to this installation option (this could be a variance to the “hanging option” for Strips or tiles too), is to build your own rack so as mount this a bit more professionally than just placing on the tank top with spacers.
This picture to the left (click to enlarge is intended to give the reader ideas, not as the only way to build this.
In our opinion this type of DIY rack is vastly superior in both flexibility and especially cost when compared to the pricey and very confusing TMC AquaRay Rail mounting systems!
 *Similar to the above, another relatively easy installation method is to make a pvc grid.
With this grid, it is easy to run the wires though pvc pipe to each LED strip, which in turn is easily screwed into the pipe with the hardware (wood/metal screws) provided by TMC AquaRay 500/600s (similar LED strips of other brands can be mounted this way too).
* Although more popular/common with LED Tiles, the Strips can also be easily hung/suspended above an aquarium using wires, etc.
Please see the LED Tiles section for pictures
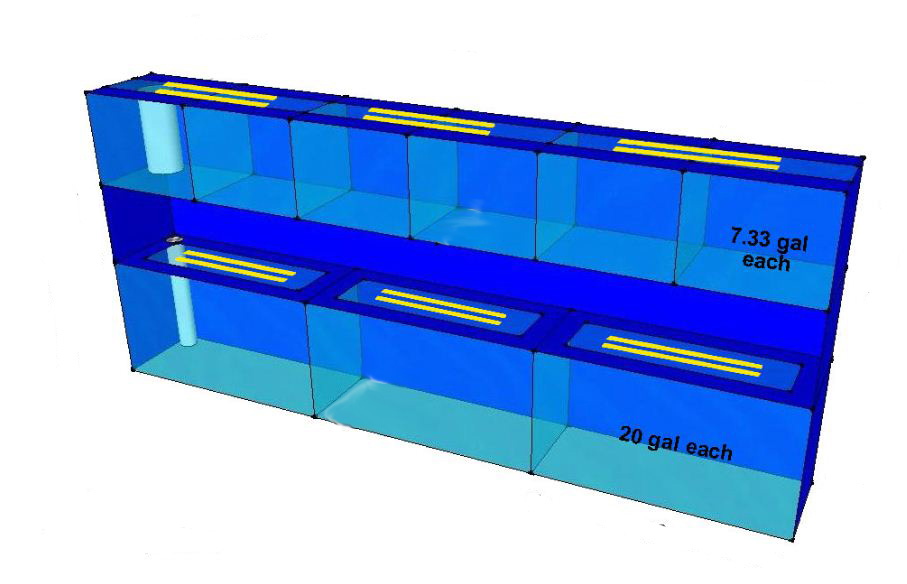 *Another method that is similar to canopy mounting is shelf mounting.
This method can be used for aquariums that are simple placed on stands or shelves with a shelf above (which the LED Strip is place on), or for larger “Aquarium Condos” popular with breeders, fragging, etc.
The picture above (click this picture to enlarge) is of an aquarium Condo with a rough outline of where the LED Strips will be placed above the Tanks.
This method also can be employed for tiles too.
LED Tiles, such as the TMC AquaBeam 1500 Ultima or GroBeam 1500, AquaBeam 2000 Ultima NP Reef White, and others.
Resources:
GroBeam and Ocean Blue 1500 Ultima
TMC Reef White 2000 NP Ultima
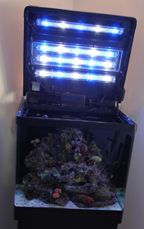
 *As with the LED Strips, mounting in a canopy is generally the most simple and effective way to mount an LED Tile as well.
I would also add (& this applies to the LED Strips too), the one potential negative is trapped moisture and some heat build up inside a canopy, HOWEVER most canopies are open in the back and for extra ventilation I suggest the use of a top vent as well and maybe a small Computer PC fan installation to move air through your canopy.

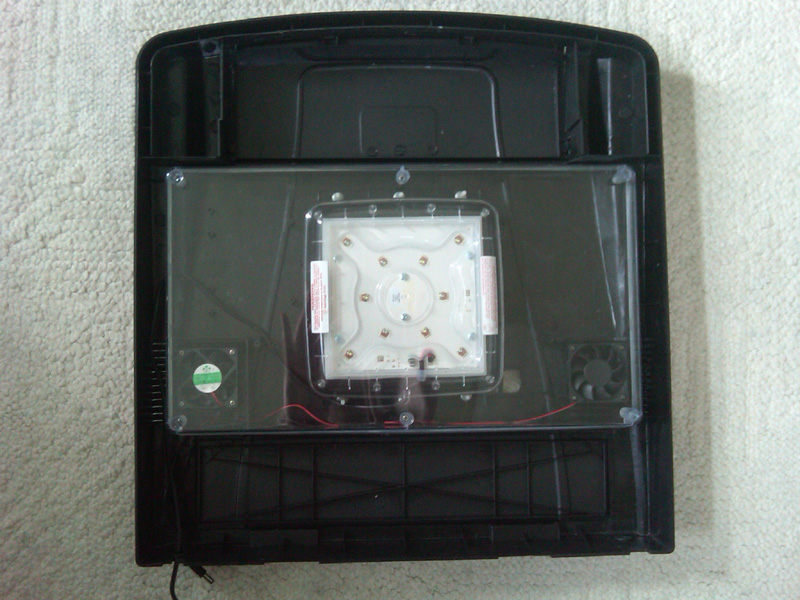
This picture displays a creative way to add space for better heat and humidity/moisture ventilation around the LED Tiles.
This planted freshwater aquarium is utilizing Gro Beam 1000s installed with 1.5″ nylon spacers to create space between the heat sink and the surface of the canopy.
While this is not a necessity, these spaces allowed the aquarium hobbyist who installed these lights to provide the optimum distance as well as good ventilation and air circulation around the heat sink.
(Please note that over heating has not been a problem with these LED lights or any of the tiles by other manufacturers I have experienced or heard of.)
Reference: TMC GroBeam 1000 & 1500 Customer Review

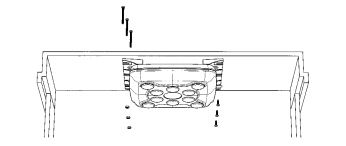
Another option that is more sturdy would be to use the TMC rails to mount the fixtures. A unique idea would be to cut the rail to size and drill holes to fit the Teflon screws so that you can mount the fixture in your hood sturdily (when drilling make sure the holes are at a even distance to distribute the weight evenly). You could also add the end caps to provide additional security. In my opinion this is a much better option to mount the 1000 fixtures in a hood over the mounting supply included with the fixtures.
 *As with LED Strips, mounting on tank tops is a viable option, albeit not a favorite of mine.
Again I would also suggest a minimum of 1 inch spacers to raise the LED Fixture from the glass, acrylic, etc.
 *This is a very popular and maybe just as simple an option as the canopy method, this just depends upon whether you have a good place to attach/suspend from your ceiling the wires, rails, or whatever else you plan to use for hanging the tiles (or strips).

*This picture to the left shows the “more professional” but also more pricey use of the TMC Suspension Mounting Wire Set along with a cut 490mm TMC Rail
This picture can be clicked to enlarge
 *The picture to the left displays a wall mounted plant hanger used to suspend an LED Tile.
The advantage of the hanging method is heat and more importantly moisture dispersion. This method also is the preferred method of lighting of any kind over open Reef or Frag tanks, allowing for 100% light to water penetration.
*RED SEA MAX 130D & 250 RETROFIT
 *Probably the most difficult is a retrofit would be a hood prefabricated with a complicated lighting system such as the Red Sea Max 130D (of coarse this depends upon your DIY abilities as for some this may be as simple as tying your shoe).
This is a perfectly viable option that will likely be different for each person depending upon aquarium, LED brand as well as desired Light Strips.
*Similar to the Red Sea Max are the popular Bio Cube Aquariums. A Retrofit of these is not quite as difficult in my opinion, although the LED strips will not fil in the front cover section without some serious “sawing” modifications.
The said, the pictures above (click to enlarge) tell the story of how a AquaBeam Ocean Blue 1500 fits rather nicely into a 29 gallon Bio Cube.
The Pictures show from left to right to left again:
(1)Bio Cube with stock Compact Fluorescent lighting
(2)Bio Cube with TMC OceanBlue 1500 Tile Lighting
(3)How the install looks inside the aquarium.
Resource: High Output Ocean Blue Aquarium LED Light
It is noteworthy that the “Ocean Blue” is somewhat darker, but that is due to the 50/50 mix of blue and lower 9000K daylight lamps that are best for a tank of this more shallow depth.
It is also important to note that what you see with your human vision is not what the corals necessarily require, in other words “Useful Light Energy”. In this particular aquarium, the corals almost immediately responded favorably to the higher quality light.
See Aquarium Lighting Facts; Useful Light Energy (PUR)
FLUVAL EDGE MOUNTING WITH MINI 400 OR 500 LED TILES:
These can be easily mounted using brackets included, such as in this helpful YouTube Video:
Fluval Edge 12 gallon (46L) AquaRAY MiniLED 500HD Lighting Retrofit
MODULAR LED MOUNTING SYSTEM & MOUNTARAYS:

Another new idea for mounting the AquaRay line of LED lights that is especially nice with the new Mini 400 & 500 Aquarium LED Tiles are the MountaRay Singles.
These allow for simple on the side mounting, especially for small “Nano” tanks (under 15 gallons).
TMC also offers a Twin Set of MountaRays which then incorporate rails for mounting all 500, 600, 1000, & 1500 LED lights. However this systems still is somewhat flawed in that the MountaRay is designed for rimless tanks and there for the rim must be cut or the whole system much be placed on the aquarium (which is a bit clumsy IMO).
Hopefully this one flaw in the MountaRay set will be corrected soon so as to make this a viable option to many more
Sources:
–Mini 400 Planted Aquarium LED, Mini 500 for Reef Nano Tank
–MountaRay; Single for Mini 400, 500 LED; Set for rail system
TMC Mounting System
Finally if you have an AquaRay LED light Fixture, TMC offers a unique mounting system that can be used in cabinets, hanging above the aquarium or with the MountaRay Sets.
While I might be a big fan of the AquaRay LED lights (based on both use and research), this mounting system is somewhat flawed.
This is not to say that this might be a perfect fit for many who do not have a canopy of desire to neatly suspend MANY LEDs at once over an aquarium in a neat and professional way.
However I have found that the majority of applications can utilize the other methods noted here which use the basic mounting parts that are supplied with the TMC AquaRay LED Light Fixtures.
Please click on this resource link to see what TMC offers:
TMC Modular Mounting System
Here are a few of my thoughts as per positives and negatives of this system:
- Positive; Very neat and professional mounting
- Positive; makes suspending these lights over an aquarium a single platform unit
- Negative; some persons find this complicated, but not all (based on my communications)
- Negative; For rails over 1610 mm, these rails become too flimsy and I strongly advise to use multiple mounting system platforms for large aquariums rather than single length rails that will extend over an aquarium more than 6 feet in length.
- Negative; I do not advice the use of the rails with the MountaRays for more than 1610 mm and better is to keep their use under 1090mm and simply use more sets for large aquariums
I strongly urge readers to read over the TMC Modular Mounting system link and decide for yourself, as you might find this system the perfect fit for your needs.
CANOPY VENTING, LIGHT & POWER SUPPLY PLACEMENT TO PREVENT DAMAGE:
As with any aquarium lighting system, proper venting or “spacing” from aquarium top is a must.
As a friend noted with his aquarium maintenance business with one client (a restaurant he maintained dozens of aquariums for in the late 70s to early 80s), all these aquariums had enclosed canopies but for a back cut out. He had many failures of relatively basic T8 fixtures until he provided cross ventilation by cutting a hole in the top of each canopy.
This same principle is all the more a must with high end lights such as TMC LEDs with their sophisticated circuitry; it is imperative for your canopy (if used) to have cross ventilation and a cut out in the back of a canopy is NOT cross ventilation.
This becomes even more important with many high end LED light fixtures.
What is noteworthy is that emitters MUST be driven a a certain voltage to provide a consistent spectrum.
Many low end LEDs do not have very good drivers, instead they daisy chain their emitters together rather than use PWM to run their LEDs.
It is this circuitry, in particular certain diodes that need to be protected for moisture
However, this is not as much a problem as some misinformed aquarium keepers think.
In fact as per one manufacturer of high end LED fixtures, since November 2011 to the end of January 2013, 23 returns with failed diodes from true defects have been noted out of 22,748 units sold. This represents a failure rate of 0.1011%, basically 1 in 1000.
I should note that the newest emitter bins (as of 2013) such as the XB-D, can handle more variances in voltage that moisture can often cause, so hopefully moisture issues will become even less of a problem for those who might have their LEDs mounted in a less than optimal way to protect their investment.
*Canopy Placement
For those who claim they never see any moisture, I will add even if moisture is not seen, it can still get into circuitry if air stagnates creating high humidity inside the canopy. You may not see any moisture in humidity as high as 99% (under 65% is best), but this is much too high for any lighting system, yet alone one with sophisticated circuitry. It is noteworthy that generally condensation moisture will not occur until 100% humidity, while anything above 65% is damaging to electronics.
Think of it this way, is your aquarium canopy set up in a way you would be comfortable keeping your lap top computer inside while running?
The bottom line is it is essential to provide cross ventilation in a canopy for your light. This means not only the typical cut out in the back, but also in the top (or at least the side) so as to provide this cross ventilation.
Also, the addition of a small computer exhaust fan will help further for canopy ventilation.
*Direct Placement Placement on Aquarium Top/Lid
Humidity/Moisture damage can also occur from direct placement on glass lids; however placing any “high end” LED on wood, plastic, or any other type of spacer that provides at least 2 inches of space generally prevents moisture/humidity damage from occurring.
The reason is not that the water/moisture “magically” passes through the glass or acrylic lid, rather it is the heat generated by the light that causes condensation on top of the lid that in turn can damage your LED Light Circuitry.
By providing 2 inches of space, this generally does not allow for moisture damage due to condensation.
*Open Placement
Open water placement (meaning with no glass, acrylic, or polycarbonate top between light and water), especially within a canopy over saltwater is not advised for ANY LED with electronic drivers (again no different than placing a lap top over your open aquarium).
However I know of freshwater placements over VERY well ventilated aquariums where the light was over 12 inches and no air stones or other water circulating devices were allowing any increase in moisture laden air.
*Power Supplies
As for power supplies; I also know from conversations with a friend who specializes in UV Sterilizer use and applications that placement of power supplies/transformers (in particular electronic, not so much magnetic) is important too, which is why he is especially careful with UV Sterilizers that have built in ballasts.
He noted to me that that power supply failures were “significantly lower” when the power supply unit (PSU) was protected from all moisture and not placed in an area that does not easily allow for heat to escape from the PSU.
One manufacturer, TMC acknowledged in 2011 that their PSU design allowed for a failure rate over an acceptable 3% due to heat buildup, however this problem was fixed in late 2011 and the failure rate is less than 2%.
Even then, my aquarium maintenance friends were careful of their placement of the PDUs and most as of 2013 still have the original PSU dating back to 2009.
My point is; if your power supply for whatever brand LED you are using is going out prematurely, you need to also take a hard look at its placement as too.
Finally, one person I know claims to keep any moisture out of his clients LED delicate circuitry by adding a “bead” of Aquarium Silicone around the plate sealing the emitter lens and body of the fixture.
I cannot vouch for this as this also may aid in trapping moisture too.
LED Aquarium Lights along with T2 Lights are finally getting the notoriety they deserve which is now bringing up many questions for mounting.
Mounting is generally easy for most applications since their size (along with T2s) make them often an easy fit. Some LEDs such as the Marineland Double & Single Bright already come in a an easy to mount hood, however these LEDs are really only a replacement for a common T8 Aquarium Lamp and thus not really recommended for planted freshwater tanks requiring higher lighting and most definitely not for reef tanks!
Further Resources:
–Aquarium LED Lighting, Reef, Planted
–Aquarium LED Light Review; Including Marineland, EcoTech, Orphek, Evergrow, more
I strongly urge readers to read:
“Aquarium Lighting”
The above article is a MUST READ for further information if you are considering some of the lower technology LEDs that have sadly also flooded the market or you are still convinced a CFL is even close to the higher end LEDs such as the TMC AquaRay, Orphek, or possible Kessil.
This article will give researched lighting information to help you make a more educated decision about your aquarium light needs.
As well the article below is a MUST READ!!!
PUR, PAS, PAR in Aquarium Reef/Planted Lighting
Related Content of possible interest:
Another aspect of aquarium/pond keeping I have been associated in is UV Sterilization and the use of a UV Sterilizer to lower disease incidence, improve Redox, and control green water.
For readers with a UV Sterilizer, I would like to remind you to change your UV Bulb ever six months for aquariums for optimum performance and to change your Pond’s UV Bulb once per year in cooler climates and 6 months in warmer climates (such as California, Texas, Florida, etc.)
For those who do not have one of these useful tools for aquarium husbandry, I recommend reading the noted UV Sterilization article (below)!
References to the above aquarium information/product suggestions:
–Aquarium Ultra-Violet Sterilization, Facts and Information
–UV Sterilizer; for Aquarium or Pond
–UV Replacement Bulbs Page One
Copyright 2019, By Steve Allen